AACT Member-Only Content
You have to be an AACT member to access this content, but good news: anyone can join!
Color Solar Power! Mark as Favorite (13 Favorites)
LESSON PLAN in . Last updated February 14, 2024.
Summary
In this lesson students will make a dye-sensitized solar cell (also known as DSC or Gratzel cell) using extracts from blackberries, raspberries, blueberries, red cabbage, strawberries, beetroot, spinach and dried hibiscus petals. Students will measure the voltage and the current of various light sources using the created solar cells and then compare the effectiveness of each.
Grade Level
High School
NGSS Alignment
This lesson will help prepare your students to meet the performance expectations in the following standards:
- HS-PS1-2: Construct and revise an explanation for the outcome of a simple chemical reaction based on the outermost electron states of atoms, trends in the periodic table, and knowledge of the patterns of chemical properties.
- HS-PS1-3: Plan and conduct an investigation to gather evidence to compare the structure of substances at the bulk scale to infer the strength of electrical forces between particles.
- HS-PS2-6: Communicate scientific and technical information about why the molecular-level structure is important in the functioning of designed materials.
- HS-PS3-2: Develop and use models to illustrate that energy at the macroscopic scale can be accounted for as a combination of energy associated with the motions of particles (objects) and energy associated with the relative position of particles (objects).
- HS-PS3-3: Design, build, and refine a device that works within given constraints to convert one form of energy into another form of energy.
- HS-LS1-5: Use a model to illustrate how photosynthesis transforms light energy into stored chemical energy.
- Scientific and Engineering Practices:
- Analyzing and Interpreting Data
- Planning and Carrying Out Investigations
Objectives
By the end of this lesson, students should be able to
- Make a working solar cell using dye from plant extracts.
- Compare and explain the effect of the source of light on the voltage and current produced by the solar cell.
- Relate the molecular structure of the dye to its capability to produce electrical power.
Chemistry Topics
This lesson supports students’ understanding of
- Electrochemistry
- Photoelectric effect
- Electricity
- Photovoltaic cells
- Redox reactions
- Photosynthesis
- Renewable Energy
- Engineering
Time
Teacher Preparation: 30-90 minutes (see teacher notes)
Lesson:
- Engage: Day One - 15 minutes
- Explore: Day One - 45 minutes, Day Two - 60 minutes
- Explain: Day One - 30 minutes
- Elaborate: Day Two - 15 minutes
- Evaluate: Day Two - 15 minutes
Materials (per class, 6 working groups)
Day One: Titanium Dioxide Anode:
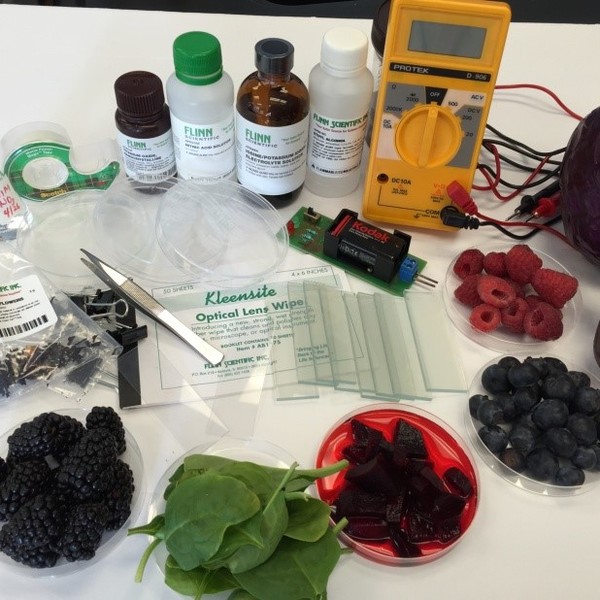
- six conductive glass size 1" x 3"
- six hot plates (less if some groups can share, minimum of 2)
- six forceps or tweezers
- six multi meters or conductivity tester (less if some groups can share)
- 7 stirring rods
- transparent tape
- lens wipes (such as KimWipes)
- 4 grams nanocrystalline titanium dioxide
- 6 mL of 0.001M nitric acid (part of the kit)
Day Two:
Carbon-coated cathode:
- six conductive glass size 1" x 3"
- Set-up (A) Use candle soot as source of carbon
- six candles
- six beakers
- match sticks or wand lighter
- six crucible tongs
- six cotton swabs
- Set-up (B) Use pencil as source of carbon
- six graphite pencils
Titanium dioxide-coated anode:
- four blackberries
- ten blueberries
- four raspberries
- four strawberries
- 3 leaves of diced red cabbage
- 1 piece of diced beetroot
- 0.5 gram dried hibiscus petals
- four sets of mortar and pestle for each fruit
- four pieces of cheesecloth approximately cut into 5" x 4" per piece to filter each fruit
- six 150-mL beakers
- seven Beral pipets (one for each dye source and one for the ethyl alcohol)
- six tweezers
- denatured ethyl alcohol, anhydrous 5 mL one hot plate for the group that will prepare the hibiscus dye extract (optional)
Assembly of the Solar Cell:
- 12 small binder clips (part of the kit)
- iodine/potassium iodide electrolyte solution in ethylene glycol, 2-3 drops per group for total of 1 mL (Part of the kit. Note that this solution is different from the aqueous iodine-potassium iodide solution used for the starch test)
- one Beral pipet for the iodine/potassium iodide electrolyte solution
- six multi meters
Safety
- Always wear safety goggles, apron, and gloves when handling chemicals in the lab.
- Students should wash their hands thoroughly before leaving the lab.
- When students complete the lab, left over fruit should be thrown in the garbage.
- When working with acids, if any solution gets on students’ skin, immediately alert teacher and thoroughly flush skin with water.
- When diluting acids, always add acid to water.
- Ethylene glycol is combustible and can be highly toxic for sensitive individuals. The solvent used for the iodine/potassium iodide solution is ethylene glycol.
- Ethanol is flammable. Do not use it in the same room with open flame.
- Iodine is irritating to skin and eyes. Wear gloves when handling the iodine-potassium iodide solution.
- Nanocrystalline titanium dioxide is fine dust and may be harmful if inhaled. Make the suspension in a fume hood if available.
- Always use caution around open flames. Keep flames away from flammable substances.
- Always be aware of an open flame. Do not reach over it, tie back hair, and secure loose clothing.
- Open flames can cause burns. Liquid wax (from the candle) is hot and can burn the skin.
- Exercise caution when using a heat source. Hot plates should be turned off and unplugged as soon as they are no longer needed.
- When lighting the match and wooden splint, be cautious with the flame.
- An operational fire extinguisher should be in the classroom.
- Any student who may be allergic to strawberries or to any of the materials used in this experiment that serve as the dye source should not handle the fruit, vegetable or dried flower petals.
Teacher Notes
- Engage: The teacher will lead the students in a class discussion about solar power as alternative energy source. The following topics which are meant to further engage students are optional, depending on time availability:
- Show examples of solar-powered devices such as a calculator or garden lights. Ask students what they understand about solar energy and its advantages over other sources of energy.
- Emphasize that the calculator has a thin film solar panel. What if there is a possibility of having a thin film solar panel as part of cell phones such that there is no need for plugging the cell phone into an outlet to recharge?
- Show this article to class (project on screen or provide copies for students to read) about the government's effort, called the SunShot Initiative, to subsidize private companies such as PPG to manufacture cost-competitive panels by automating the assembly process. Explain that photovoltaic (PV) means a solar cell, the basic component of solar panels.
- Use the picture from PPG's 2011 Corporate Sustainability Report on page 16 to show students the power producing photovoltaic fields. “These fields are expected to have a power-producing lifetime of 30 or more years, helping to reduce the US reliance on foreign fossil fuels, improve national security and protect the environment.”
- Another application that can be mentioned is the use of solar panels as roofing or windows to not only serve as part of the structure but also as source of electricity. This is called Building Integrated Photovoltaic Systems, or BIPV. PV Resources website may be used to provide more information.
- Explore: The main focus of this activity is for students to make a working solar cell using dyes as photo sensitizers. An undyed solar cell will serve as control. A variety of dye extracts will be tested by different groups in the class and the results consolidated. The student handout for the experiment provides the steps to make one solar cell and includes post lab questions to guide students to analyze the results.
- The materials and set-up are designed for a class of 24 students to work in 6 groups of 4. Each group will produce one solar cell. The list of materials given above is enough to make 6 solar cells. On Day One, students work on coating the conductive glass with titanium dioxide. This will be kept overnight in a dark place. On Day Two, each group will be split into two pairs. One pair of students will dye the titanium dioxide anode with the fruit/vegetable extract and the other pair will prepare the carbon-coated cathode. The iodine/potassium iodide electrolyte is added to the anode immediately before putting the two electrodes together and testing for voltage and current.

- It is preferred that materials be bought as a kit as supplied by Flinn. The Flinn kit AP8366 Green Chemistry: Design and Function - Blackberry Solar Cell has enough materials to make seven solar cells (fruit not included) while the Flinn AP6916 Build a Solar Cell - Student Laboratory Kit can only make four solar cells but it has the dried hibiscus petals. However, if preferred, some of the materials can be bought separately as indicated below:
- The iodine/ potassium iodide electrolyte solution in ethylene glycol comes as part of either the AP8366 or AP 6916 kits. It is not available to be bought separately. Note that this solution is different from the aqueous iodine-potassium iodide solution used for the starch test
- Also note that the option of using Dried hibiscus petals, as shown in the photos above are available from Flinn's Build a Solar Cell kit AP6916.
- Teacher Preparation: Allow 30 minutes to collect/prepare materials and to make the control, undyed solar cell (optional). An additional 30 minutes is needed, if the teacher chooses to prepare the anode and coat the titanium dioxide on the glass plates outside of class, instead of letting students complete it on the first day. Also, an additional 10 minutes to extract the hibiscus dye from the dried petals (optional, if it is desired to also include hibiscus as dye source).
- If a teacher chooses to have a control (no dye) solar cell, it can be made in advance following the procedure as outlined in the student handout excluding the application of the dye extract to the titanium dioxide-coated anode. This would require an additional pair of conductive glass in addition to the six pairs that is allotted for a class of 24 students. The Flinn kit AP8366 Green Chemistry: Design and Function - Blackberry Solar Cell has enough materials to prepare a total of seven solar cells to make six dyed solar cells and one undyed that will serve as the control. If the teacher opts not to make the undyed solar cell, it is sufficient to just mention to class that without the dye, the cell will not produce any voltage nor current.
- If a teacher chooses to extract the hibiscus dye, it should be done one day before application and kept in the refrigerator overnight. To do this, place about half gram of dried hibiscus leaves into a 150-mL beaker. Add 25 mL water and heat to boiling for about 5 minutes. Cool at room temperature before putting in the refrigerator.
- Day One: Titanium Dioxide Anode: Each group of four students will prepare the anode by coating it with titanium dioxide. The teacher will prepare the titanium dioxide suspension as described below. Once prepared, the teacher will distribute the suspension by making two streak lines on the conductive side of the glass plate for each group. The students then proceed to complete the preparation as outlined in the student handout.
- Teacher preparation of the TiO2 suspension:
- Using the tip of a stirring rod, mix 3 mL of 0.001M nitric acid into 2 grams of the nanocrystalline titanium dioxide.
- In the Flinn kit AP8366, the nanocrystalline TiO2 will come in two, 2-gram brown bottles for a total of 4 grams. This amount is enough to make seven solar cells. If the nanocrystalline titanium dioxide is bought separately from Flinn and not part of the kit, it would still come in a brown bottle and mixing should be done in this brown bottle the chemical is packaged in.
- Day Two: Carbon-coated cathode: Six uncoated conductive glass will be used for the cathode. To produce soot or
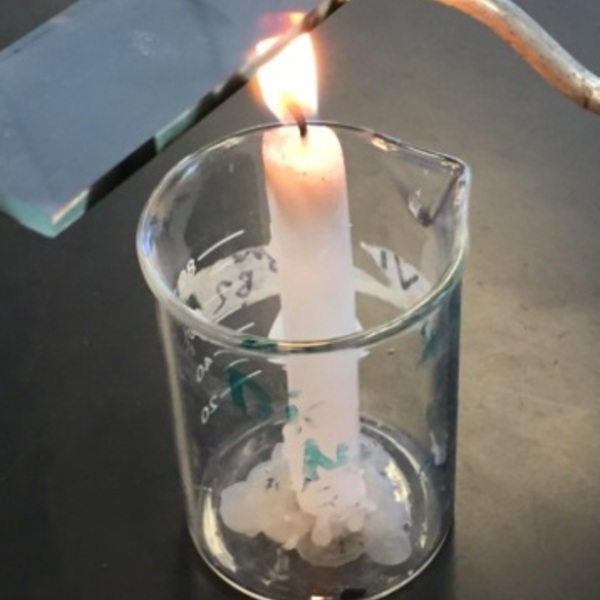 carbon coating, students can either use a candle attached to the bottom of a beaker with melted/hot wax (shown in photo); or graphite pencils. Tea lights are not recommended because they require more time to coat the conductive glass slide, and do not produce an even coating. Cotton swabs (one per group) are also needed to remove graphite coating from the edges of the slides if a candle is used.
 - If using the candle, expose the conductive side of a plate to the candle flame to cover it with soot or carbon. This will serve as the cathode. If using graphite pencils smear the tip of the pencil sideways into the conductive surface of the glass to produce an even carbon layer.
- Day Two: Titanium Dioxide-Coated Anode: Assigned a dye source to each group. For example, first group may use blackberries, second group blueberries, etc.
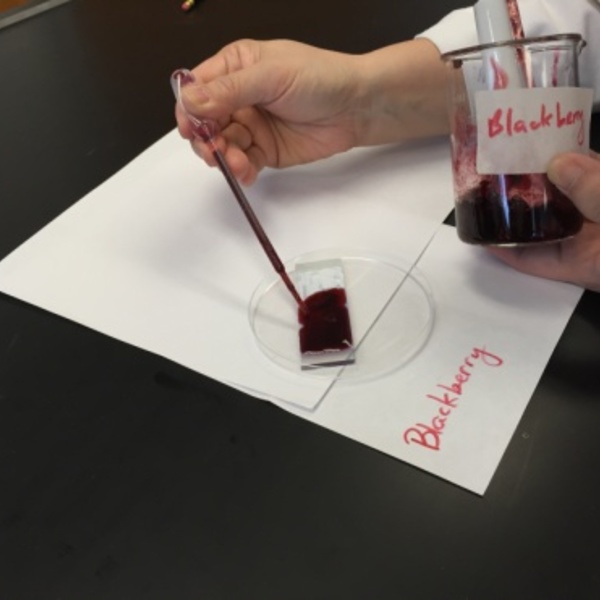 The class will consolidate the data at the end of the experiment. Fresh fruit is ideal but thawed frozen fruit will also work. Each cell will need about two pieces of the fruit and a 2-gram package of dried hibiscus petals.
 - If there is not enough time, the fruit extract (made by crushing the fruit using a pestle) can be transferred directly to the titanium oxide coated glass slide using a Beral pipet. However, filtration using a cheesecloth is suggested as this will prevent big chunks of the fruit to adhere to the coating, which can cause the coating and the pieces of fruit to peel off together when rinsing with distilled water.
- Answer Key, including sample data has been included for teacher reference.
- Explain: Students should have prior knowledge of redox reactions/electrochemistry and familiarity with terms used in this topic such as electrolyte, reduction, oxidation, cathode and anode. In addition, students should also be able to explain the basic principle behind the photoelectric effect. To address this requirement, pre-lab questions are given in the student handout for the experiment.
- To have an understanding of the process involved in a dye-sensitized solar cell, background information is given in the same laboratory student handout. The differences between the traditional silicon-based solar cell, the printable solar cell, and the dye sensitized solar cell, are also briefly discussed. The separate student handout titled "Solar Cells: Photovoltaic Cells" is included as a supplement. An answer key has also been provided. If desired and time permits, this handout may be given as homework to allow students to answer more in-depth questions about solar energy.
- Elaborate: A supplemental student handout called "Anthocyanins and Betalains as light-harvesting dyes or photosensitizers" has been included and is about the UV-VIS absorption characteristics of the natural dyes extracted in this lab. An answer key document has also been supplied. This property may also be investigated as a separate laboratory experiment. Left over fruits and vegetables from the solar cell lab can be put into good use through this activity. The collection of the full spectrum can be done as a whole class. Apart from the 3.5 mL of the dye extract, only cuvettes and the spectrophotometer/colorimeter are required.
- Evaluate: Students complete the provided student handout individually or in their groups.
- Extension: As a project-based lesson, students can make miniature energy-efficient houses where they can test the solar cells as roofing or as a window. In the picture above, the change in the amount of light was measured from 504 lux classroom light to 10 lux due to the opaque color of the glass solar cell. This can translate to a decrease in temperature inside the house resulting to lower energy requirement during the summer months. The electrical power generated by the solar cell can also be tested using small LED bulbs that can be used inside the house.

For the Student
Download all documents for this lesson, including the teacher guide, from the "Downloads box" at the top of the page.